
I had no such problems with the two coin doors once I had dismantled them but
they were made easier by the fact that there was no coin mechanism attached
to them any longer. That had long gone. I used the same paint I had used
on the control panel and again it gave a good finish because the coin doors
already had a dimpled texture to them.
At some point I may pick up a coin mechanism for the cab and fit it but at the moment credits are added using a button on the panel. Time to wire it then.
The emulator M.A.M.E. has a standard set of inputs, for example, pressing [5] will insert a coin (credit), pressing [1] will begin a 1 player game and pressing [2] will begin a two player game. Movement is controlled using the keyboard?s cursor keys, up for up, down for down, left for left and right for right. Fire button 1 is mapped to the [CTRL] key, Fire button 2 to the [Alt] key, Fire button 3 to the [Space Bar] and Fire button 4 to [LSHIFT].
This means that if you run M.A.M.E. on your own PC those are the keys you would use for each game, some games using as many as eight Fire buttons or even two joysticks for a one player game such as Robotron or Battlezone. What we need then is some kind of interface between our arcade controls and our PC inputs, the PS/2 or USB sockets. The way this used to happen is that you would plug your keyboard into the computer but you would hack into it and put simply you would solder a connection between your Player 1 Fire button 1 and the [CTRL] key. Then you would solder a connection between your coin slot and the keyboard [5] key and so on and so on. The problem with this is that it can get very messy very quickly and is ever so slightly annoying if your keyboard breaks.

Enter the I-Pac.
The I-Pac is a small PCB (Printed Circuit Board) which takes the place of the hacked keyboard and sits between your controls and your PC. Each press of a fire button or directional movement on the joystick triggers one of these, a micro switch, which is obviously connected to the I-Pac.
If you look at the top right of the I-Pac you will see a connector labelled GND (ground) this must be connected to the bottom contact of each micro switch in the cabinet. It can be daisy chained around each one and does not need returning to the I-Pac. Once that is done, you will see that the next connector is labelled 2RGHT. This must be connected to the right direction micro switch on the Player 2 joystick. The next one is 2LEFT which goes to the left direction micro switch and so on and so on until each control has been connected to the I-Pac. To make swapping parts out later if need be I decided not to solder the connections but to use crimpers and Spade End fittings.
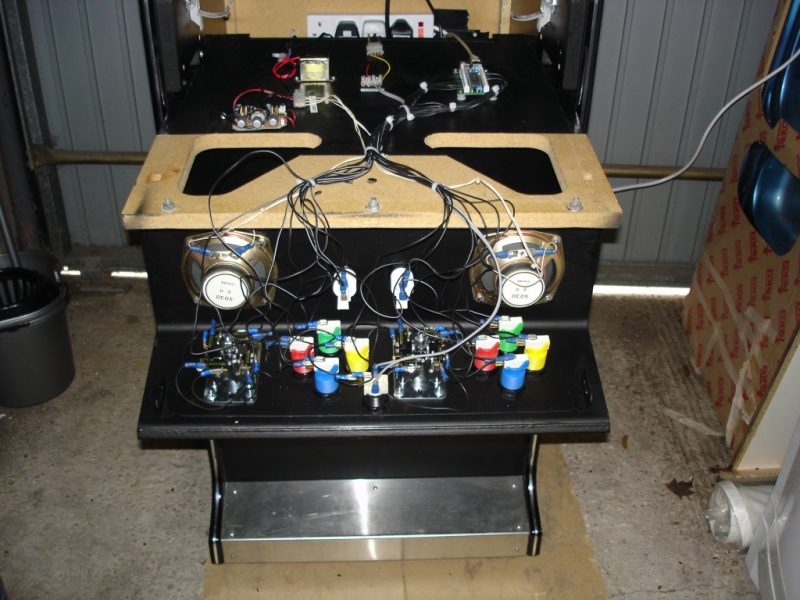
Here is the finished wiring job with the speakers in place and at first glance you can see that it looks a little bit daunting with the number of wires but it really is quite simple to do if you take it a step at a time. Here is the finished panel from above and in the centre you can see the single lit button I have included as a coin insert button. Perhaps on a future project I will use more lit buttons as I think they look very impressive when lit up. While I may have scrimped and saved a little on my Vinyl finish for the sides I paid a little bit extra for the two joysticks but I'm glad I did now.
The I-Pac is a small PCB (Printed Circuit Board) which takes the place of the hacked keyboard and sits between your controls and your PC. Each press of a fire button or directional movement on the joystick triggers one of these, a micro switch, which is obviously connected to the I-Pac.
If you look at the top right of the I-Pac you will see a connector labelled GND (ground) this must be connected to the bottom contact of each micro switch in the cabinet. It can be daisy chained around each one and does not need returning to the I-Pac. Once that is done, you will see that the next connector is labelled 2RGHT. This must be connected to the right direction micro switch on the Player 2 joystick. The next one is 2LEFT which goes to the left direction micro switch and so on and so on until each control has been connected to the I-Pac. To make swapping parts out later if need be I decided not to solder the connections but to use crimpers and Spade End fittings.
Here is the finished wiring job with the speakers in place and at first glance you can see that it looks a little bit daunting with the number of wires but it really is quite simple to do if you take it a step at a time. Here is the finished panel from above and in the centre you can see the single lit button I have included as a coin insert button. Perhaps on a future project I will use more lit buttons as I think they look very impressive when lit up. While I may have scrimped and saved a little on my Vinyl finish for the sides I paid a little bit extra for the two joysticks but I'm glad I did now.
Joysticks can either be 8-way, 4-way or 2-way. 2-way joysticks
only have left and right movement, 4-way
joysticks have up, down, left and right movement and 8-way
joysticks use diagonal movement too. The joysticks I bought
are switchable between 4-way and 8-way depending on the game
I'm playing. The reason for that is if you are playing something
like Skramble or 1943 then you need the diagonal movement to
move freely around the screen, but if you're playing Pacman
or Burger Time then you only need 4-way movement. On these
games an 8-way can actually cause your character to stop moving
as for example both the right and the down micro switch could
be pressed at the same time, then the game won't know how to
handle the input. What switching to 4-way does is ensures that
no two micro switches can be pressed together so the right
micro switch will be released a fraction of a second before
the down one is pressed and the game will continue as normal
allowing you to move in any of the four directions.
Some switchable joysticks are only switchable by reaching through the coin door and activating the mechanism underneath but mine are switchable from above by simply lifting and twisting the joystick until you feel the mechanism switch over. The extra I paid for that ease of switching was well worth it in my opinion, and as a bonus the joysticks have much less "throw" (lateral movement) than others I have tried and they are also magnetically centred when you let go of them. I am more than happy with the extra I paid. They are the Mag Stik Plus from Ultimarc and you can see them here.
Now that everything is wired to the I-Pac it is just a matter of plugging in a cable from the I-Pac to the computer using either the PS/2 keyboard port or a USB port. There is also a second keyboard pass through port on the I-Pac which allows you to plug a keyboard in at the same time so that you can configure the PC if necessary without disconnecting anything else or reaching right into the cab.
Copyright © JamesOnline.net. All rights reserved.