
In general a renovated MAME cab will have four components that
require Mains power and they are the PC, the monitor, the speakers
and the marquee light. You could, if you wanted to, use twelve
volt speakers and a twelve volt strip light in the marquee
and the advantage of that is two fold:
Another important issue to bear in mind is that you will have to rewire the PCs power button so that it is easily accessible and the cab can be turned on without having to reach inside and switch it on.
- You can take a 12 volt feed from the PC itself.
- Both the speakers and the marquee will only power up when the PC powers up.
Another important issue to bear in mind is that you will have to rewire the PCs power button so that it is easily accessible and the cab can be turned on without having to reach inside and switch it on.
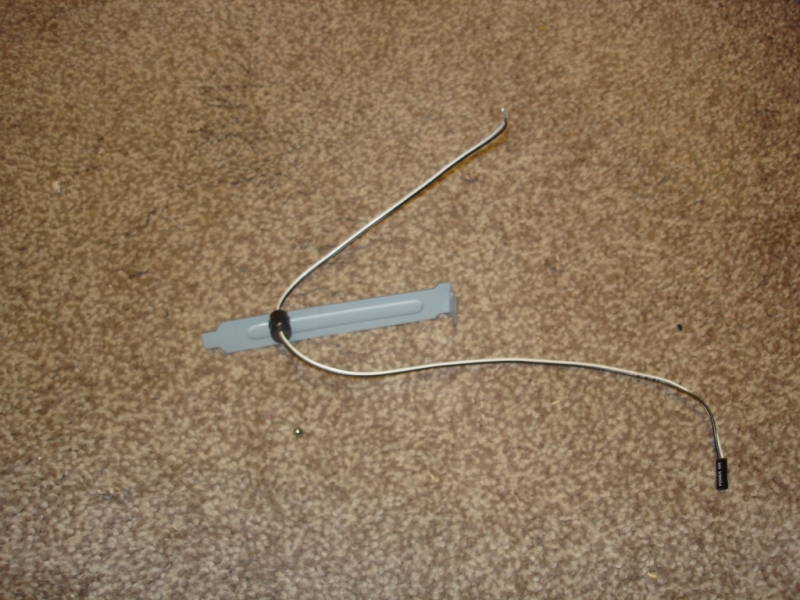
To prevent having to hack apart the original button assembly
I came up with an idea to reroute the cable out of an adapted
PCI slot cover. One end will now connect straight to the
motherboard connectors so I can just disconnect the original
one and leave it untouched, and then on the other end I fitted
a Molex Connector enabling me to run the other end to a power
button on the cab somewhere.
The beauty of this solution is that if I ever need to remove the PC from the cab at some point I can simply disconnect it here and leave all the other circuitry in place. I can also swap the PC for a different one very easily if needs be.
To hold the PC steady and in place in the cab I positioned it how I wanted it and then drew around the base with a pencil. Using the lines as a guide I screwed some thin wooden lats to the floor of the cab so that the PC wouldn't move laterally and I then held it down with a ratchet strap.
Perhaps the most awkward part of the refurb so far was seating the monitor properly. You can see that the old monitor just sat loose on a shelf and underneath you can see where previous adjustments have been made to the shelf's height, probably when the original arcade monitor was replaced.
As I was using a different sized monitor I would have to adjust the height again, and it wasn't so much that it was difficult, it was just awkward having to hold the monitor roughly in place and picture whereabouts the shelf would need to be then temporarily screwing it in place and trying the monitor on it. The idea was to find an optimal height so that when the front glass and bezel were fitted later the screen area would occupy a central part of it.
When thinking about fitting a monitor to a MAME cab there are a few things to bear in mind; the main thing is that in general a CRT monitor is the easiest thing to use. A TFT screen is no good for the job at all as arcade cabs had a wide variety of screen resolutions and refresh rates but TFT monitors have a fixed refresh rate. This means that if you play MAME on a TFT screen you will notice graphical glitches and ghosting as the picture is redrawn on screen with the wrong timing. An arcade monitor will give you the best results but
- (a) you have to get hold of one.
- (b) you need to buy a specific graphics card to send an output to it.
Copyright © JamesOnline.net. All rights reserved.