
Monitors are easily the most dangerous thing inside an arcade cabinet whether
it is an original cab or a MAME cab and the monitor can hold a charge anywhere
up to 30,000 volts. If you want to work on a monitor like this you will
have to discharge it. While it can be done it is not something I will cover
here as I have never done it. If you are going to do it yourself you must
take great care. For example NEVER go into the back of a monitor with both
arms because if you were to get a shock the current would cross your heart,
and while that is a great commodity to have in a bra, it is not something
considered wise when dealing with massive amounts of electricity, especially
if your have wire in your bra.
I will be using a CRT monitor in my cab and initially I tried to fit a 19 inch monitor because the more gaming ?real estate? you have the better, especially if you are sitting your monitor horizontally. While a horizontal orientation is great for games like Defender, any games that originally had a vertical monitor setup like Pacman will be re sized and squashed vertically so you want the biggest monitor you can get away with. Unfortunately due to the construction of my cab I was unable to fit a 19 inch monitor into it. Whenever I had the monitor in I couldn?t get the front glass in place over it, even if I completely decased the monitor it still wouldn?t go in.
Look at the difference between these various cabs and you can see how and where the monitor sits in the various constructions.
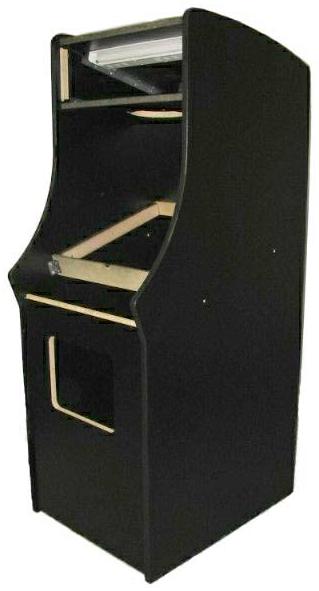
Upright Cab - Reclined Monitor
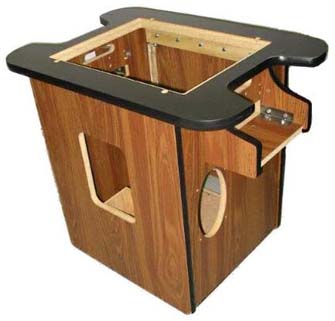
Cocktail Cab - Flat Monitor
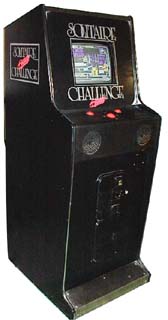
Solitaire Cab - Upright Monitor
You can see that with a cocktail cab or a reclined monitor layout there is
much more room to accommodate a larger and deeper monitor, but as it was
I just didn?t have the space to fit my 19 inch CRT in there so I had to settle for a
17 inch CRT instead.
Even that was a bit of tight squeeze as you can see from my
modifications
to it. I just had to screw a few little extra pieces of timber to the shelf to
prop up the monitor so that it would sit both centrally, and at just the right
angle so that it?s front edge sits roughly parallel with the front glass when in place.
The monitor that came with the cab was a beige one with the front fascia painted black so that it looked better in the cab, but luckily mine was a black Dell monitor so I didn?t need to worry about painting or removing the fascia.
Once all the components had been dry fitted I could test the cab to double check that
The final major part of the build to do was the Control Panel. Without doubt this is what caused me the most problems. Not only because it has to be right, it is after all the part that everyone sees and uses to interact with the cab, it is how you control not only the games but also the Frontend when launching the games. It could be described as what one might refer to as important.
There are two elements to the control panel, there are the actual buttons, trackballs and joysticks themselves and there is the interface which interprets input from these into something that the computer can understand.
The monitor that came with the cab was a beige one with the front fascia painted black so that it looked better in the cab, but luckily mine was a black Dell monitor so I didn?t need to worry about painting or removing the fascia.
Once all the components had been dry fitted I could test the cab to double check that
- (a) all the cables were the right length.
- (b) the power button on the cab worked to power the machine both on and off.
The final major part of the build to do was the Control Panel. Without doubt this is what caused me the most problems. Not only because it has to be right, it is after all the part that everyone sees and uses to interact with the cab, it is how you control not only the games but also the Frontend when launching the games. It could be described as what one might refer to as important.
There are two elements to the control panel, there are the actual buttons, trackballs and joysticks themselves and there is the interface which interprets input from these into something that the computer can understand.
Copyright © JamesOnline.net. All rights reserved.